Installing SSL in cPanel: Complete Guide
How to activate free SSL (Let's Encrypt) in cPanel. Complete guide to securing your website with HTTPS.

Once you understand how to backup website files on cPanel, the next important step is to secure your website with SSL (Secure Sockets Layer). SSL is a security protocol that creates an encrypted connection between a web server and a browser, protecting sensitive data sent between the two.
The importance of SSL for websites
As far as I know, this SSL feature will always be in the cPanel of whatever hosting provider you use, except perhaps not in free hosting.
The SSL type in cPanel is Lets Encrypt SSL. This type of SSL is free and you can use it for both your personal website and your business website.
SSL is a very important feature and you must activate it before installing any platform so that your domain looks secure in the browser, especially in the Google Chrome browser.
Some reasons why SSL is so important:
-
Data Security - Protects sensitive information such as login data, credit card information and personal data
-
Visitor Trust - Modern browsers mark websites without SSL as “Not Secure”3. SEO - Google ranks websites with HTTPS higher
-
Compliance - Many data security regulations require the use of SSL
-
Data Integrity - Ensures data is not altered during transmission
Difference between HTTP vs HTTPS
Examples of domains that already use SSL or HTTPS are like this:
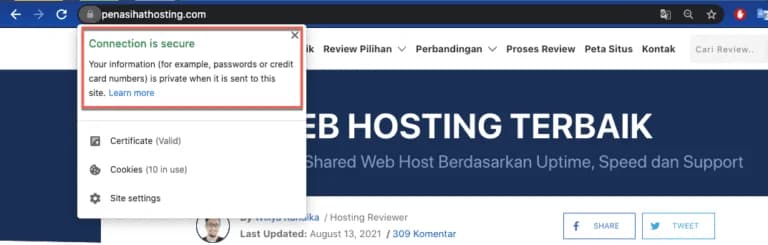
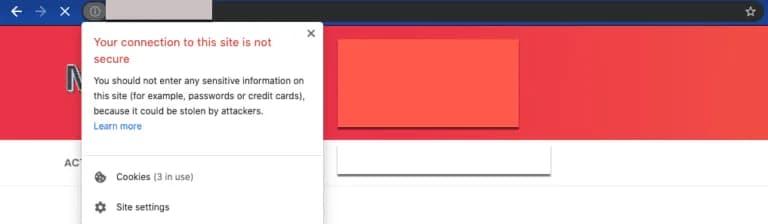
Meanwhile, if it is not SSL, Chrome will display it as "Not Secure" like this:
The main differences between HTTP and HTTPS are:
| Features | HTTP | HTTPS |
|---|---|---|
| Encryption | None | Yes, data is encrypted |
| Security | Low | Height |
| Ports | 80 | 443 |
| URL | http:// | https:// |
| Browser Indicator | ”Not Secure” | Green/grey padlock |
| Speed | Slightly faster | Slightly slower (almost imperceptible) |
| SEO | Less favorable | Preferred |
How to Enable SSL in
cPanel
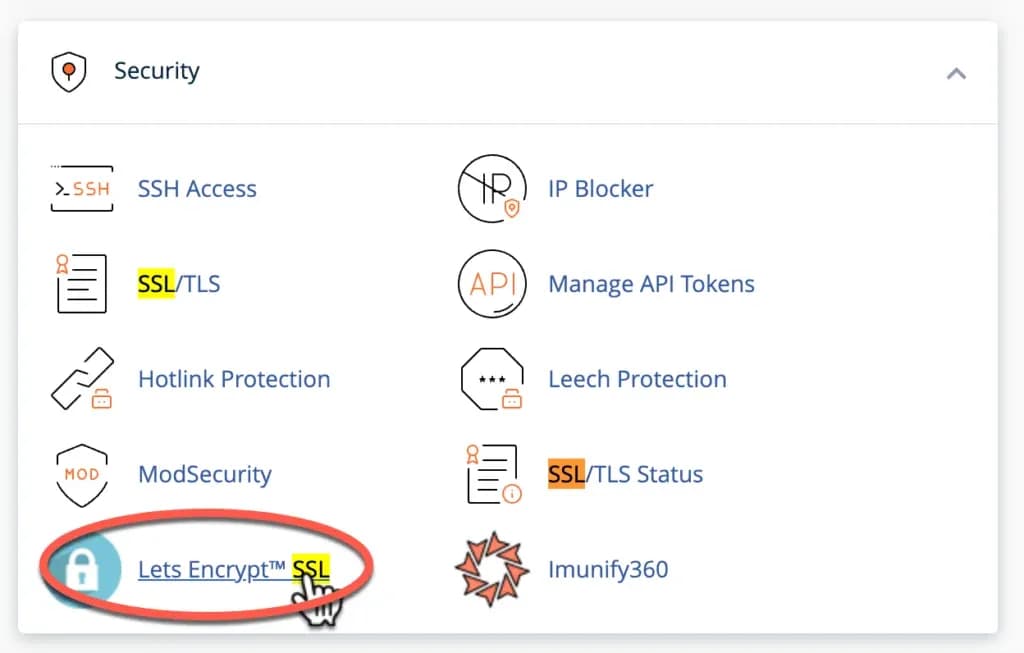
Click “Lets Encrypt SSL” in the Security section of your cPanel:
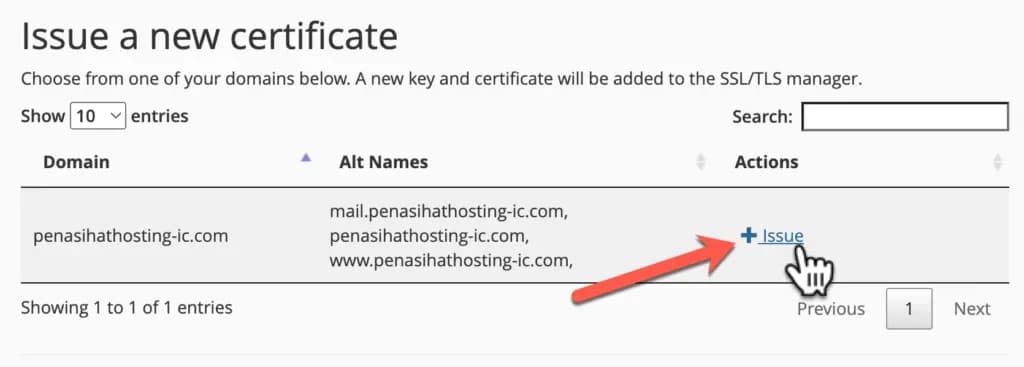
Then, click "+ Issue"
Finally, make sure all domains are checked/included and click the blue "Issue" button. The SSL installation process itself only takes a few seconds.

This SSL will be updated automatically every 3 months.

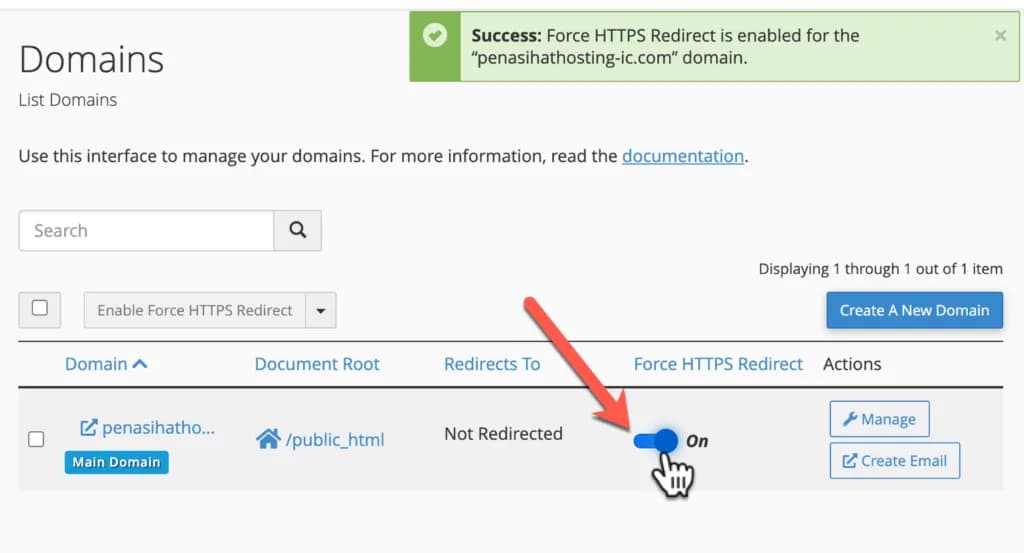
The final step, make sure you redirect the domain from "http" to "https". This is easy to do. Open the Domains function in cPanel and make sure "force HTTPS redirect" is in the "ON" position as I show in the image below:
Types of SSL
While Let's Encrypt is a popular and free option, there are several other types of SSL you may encounter:
-
Domain Validation (DV) SSL - Basic verification that you have control over the domain. Let's Encrypt is an example of DV SSL.
-
Organization Validation (OV) SSL - More in-depth verification, including organizational verification. Provides a higher level of trust.
-
Extended Validation (EV) SSL - The strictest verification, displays the organization name in the browser address bar (on some browsers). Provides the highest level of trust.
-
Wildcard SSL - Secures the main domain and all first-level subdomains (*.yourdomain.com). 5. Multi
- Domain SSL (SAN) - Secures multiple different domains with one certificate.
Let's Encrypt is the best choice for most websites because it is free, easy to install, and updates automatically.
How SSL Works
To understand the importance of SSL, it is important to know how it works:
-
Handshake - The browser and server perform a “handshake” to verify the server's identity and establish a secure connection.
-
Asymmetric Encryption - During the handshake, asymmetric encryption is used to exchange symmetric encryption keys.
-
Symmetric Encryption - After the handshake, symmetric encryption is used to encrypt all data sent between the browser and the server.
-
Data Integrity - SSL also ensures data integrity by using a hash function to verify that data has not been modified during transmission.
Verify SSL Installation
After installing SSL, it is important to verify that the installation was successful:
-
Check in Browser - Open your website with https:// and make sure there are no security warnings.
-
Check Padlock - Make sure the lock icon appears in the browser address bar.
-
Check Certificate - Click the padlock and check the certificate details to make sure they are correct.
-
Use SSL Checker - Use a tool like SSL Labs to check your SSL configuration.
Troubleshooting Common SSL Issues
Here are some common problems you may encounter when installing SSL and how to resolve them:
1. Mixed Content Warning
If you see a “Mixed Content” warning in your browser, it means some assets (images, CSS, JavaScript) are still loading via HTTP, not HTTPS.
- Change all hardcoded U
R
Ls from http:// to https://
- Use relative U
R
Ls (no http:// or https://)
- Use a plugin for WordPress that fixes mixed content
2. SSL Not Updated
Let's Encrypt SSL is valid for 90 days and must be renewed before it expires.
- Make sure automatic updates are working
- Set reminders to check SSL status periodically
- Use SSL monitoring tools to get notified before SSL expires
3. Subdomains Not Covered
If you have subdomains, make sure they are all covered by an SSL certificate.
- Make sure all subdomains are checked when installing SSL
- Use SSL wildcards if available
- Install separate certificates for subdomains if necessary
4. Browser Compatibility Issues
Some older browsers may not support the latest SSL/TLS protocols.
- Use SSL configurations that are compatible with various browsers
- Consider using a service like Cloudflare that handles browser compatibility
SSL Security Best Practices
In addition to installing SSL, there are several security best practices you should implement:
-
Use HSTS (HTTP Strict Transport Security) - Tells the browser to always use HTTPS
-
Disable Legacy Protocols - Disable vulnerable SSL v3 and TLS 1.0/1.
-
- Use a Strong Cipher Suite - Configure the server to use a strong cipher suite
-
Enable Perfect Forward Secrecy - Ensures that if the private key is revealed, previous communications remain secure
-
Renew Certificates Timely - Make sure certificates are renewed before they expire
-
Use Content Security Policy (CSP) - Reduce the risk of XSS attacks and data injection
Conclusion
Installing SSL in cPanel is an important step to secure your website. With Let's Encrypt, you can activate SSL for free and easily, providing greater security and trust for your website visitors.
In next chapter, we will learn how to install applications like WordPress via Softaculous in cPanel.
After activating SSL, make sure to update all internal links on your website from http:// to https://. This includes links in navigation menus, footers, and content. For WordPress, you can use a plugin like “Better Search Replace” to change all URLs in bulk.