Tutorial or How to Install WordPress on Cloudways
Complete guide on how to easily install WordPress on Cloudways. Learn the steps for WordPress installation, domain configuration, and SSL setup.

This article is a continuation of my series of articles regarding Cloudways review which I published previously.
I believe it would be helpful if I put together a tutorial or step by step guide on how to install WordPress on Cloudways.
Oh yes, if you are looking for a tutorial on how to migrate a website to Cloudways (not install a new WordPress), please visit this tutorial.
Actually the method is not difficult, but for beginners this process may feel a bit complicated, especially if you have just moved from cPanel and feel a little surprised by the very different Cloudways user interface.
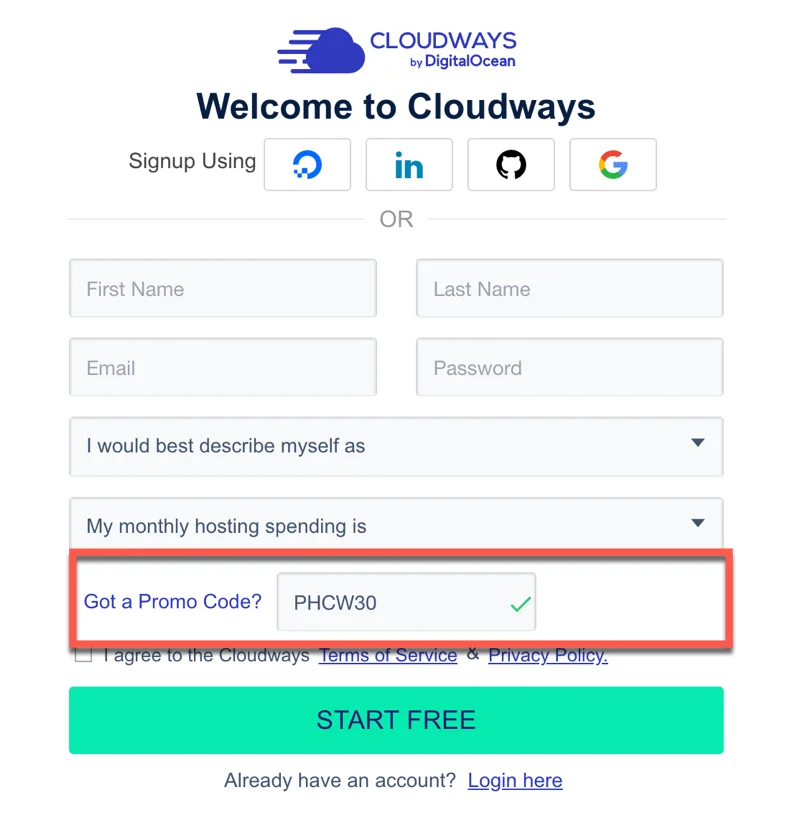
First of all, make sure you have an account at Cloudways. If not, I suggest you register first. Oh yes, you can also try the Cloudways service (trial) first for 3 days.
Cloudways Hosting
Get 30% discount for 2 months with the promo code below. Free 3 day trial no credit card required!
Try Cloudways Now
Your support helps this website keep running! I use an affiliate link, where I will receive a $65 commission from your Cloudways hosting purchase. You will not be charged any additional fees.
1. Add New Application
After you successfully log in to Cloudways, your Cloudways dashboard display may automatically use the updated user interface, as shown in the image below.
The first step you need to do is click the “Add Application” button.

If it turns out that your user interface display is still using the old one, I suggest changing it to a new one, because I'm sure they won't offer the option to change to the old (classic) display for a long time.

Then, fill in your application details:
Select the application you want to install. If you want to install WordPress which has been automatically optimized by Cloudways, then select "Version 6.1.1" (the version available at the time I wrote this review).
Or if you want to optimize your own Cloudways, then choose “Clean” (not recommended for beginners).
If you are not sure, my suggestion is to choose “Version 6.1.1”.

Next, you will be asked to fill in your application details. Includes application name, server name, and project name. You are free to fill in this section as you wish, because its contents will not affect anything and can be changed at any time later.

- Select your server. My advice if you are a beginner or just starting out or not sure then choose Digital Ocean.
- Select server size: by sliding it to the right or left. You can always start with 1 GB first and if it's not enough, remember that your server size can be upgraded later.
- Select location: if your website is in Indonesian, then select Singapore. If you speak English, my suggestion is to choose a city in the United States.
- Check your application and server details again, if they are correct, then click the "Launch Now" button

After you click the "Launch Now" button, Cloudways will set up your server and usually the process takes around 7 minutes.

2. Add Domain
Next, you need to add a domain to connect to the server.
Oh, before going to the stage of adding a domain, I think you need to know that in Cloudways the server and application settings are different and should be different, it's just that beginners might be confused.
In the image below (after you have successfully added the server in the previous step), there are 2 tabs that you need to pay attention to, namely the "Servers" tab and the "Applications" tab.

It's easy like this:
- “Servers” is the section where you manage and manage all the physical configurations of your servers, such as monitoring resource usage and managing server services.
- Meanwhile "Applications" is where you manage applications running on the server, including installing new applications, setting domains and SSL certificates, as well as managing databases and application files.
With this understanding, we can now proceed to the stage of adding a domain via the "Applications" tab and clicking on the name of the application that you created previously.
You will be taken to the following page:

At this stage, your WordPress application has actually been successfully installed, but it is still using a temporary domain name. Usually the temporary domain name is like this: wordpress-362278-1127190.cloudways.com (note what I put in the red box in the screenshot above.)
Oh yes, you can also immediately try logging in to your new WordPress "WP ADMIN" using the temporary domain by entering the username and password provided (pay attention to the 'Admin Panel' section.)
But, of course you won't use that temporary domain, right?
Then you need to add your own domain and connect it to the server.
Open the "Domain Management" menu in the left sidebar (1), click the "+ Add Domain" button (2).

Add your domain name (ignore the option to check ‘add as wildcard’)

Then, make the domain you just added 'Make Primary'

Depending on the provider you purchased the domain from, you will need to add an A Record to your domain's DNS Management.
- Type = A Record
- Host = @ (unless you want your domain name to use “www”, then fill in “www”)
- Value = Fill in your server IP (see image below 'please note')
- TTL = Leave it as is or set Automatic

*How to add A records in Cloudflare DNS management *
Also make sure you add an A record for the 'www' version of your website and that it is directed to the same IP. Later, the 'www' version will automatically redirect to the 'non www' version of your website.
- Click "Access Details" (1)
- Click the “SSH / SFTP” tab
- Click to copy your public IP

By default, Cloudways doesn't use NS, so all you need to add/replace is just the A Record.
And change your domain NS to the default NS of your domain registrar. For example, if you use NS from DomaiNesia, then change the NS to DomaiNesia's default NS. Likewise, for example, if you are using NameCheap/GoDaddy's default NS, then change it to NameCheap/GoDaddy's default NS.
Until here, you just need to wait. If you have filled in the A Record correctly, it should take less than 15 minutes or at most 24 hours for your domain to be connected to the server.
3. INSTALL SLL FREE FOR SECURITY
Until here, you just need to wait. If you have entered the A Record correctly, your domain should be connected to the server in less than 15 minutes, or at most 24 hours (and in my experience it is very rare to take 24 hours).
The final step is to install SSL for your website security.
This step is important and don't forget to do it, because if not, your website will be inaccessible / not secure as below:

*what will happen if you forget to install SSL *
How:
- Open the "SSL Certificate" menu (1)
- Select Lets Encrypt (2)
- Enter your email (3) - It doesn't need to be the same as your Cloudways email
- Enter domain name (4)
- Click the “INSTALL CERTIFICATE” button (5)

If you experience failure in the SSL installation, the most likely cause is that your domain's A Record is not fully connected to the server. So, you just need to wait a little longer.
After you have successfully installed SSL on your domain, you can check the status of the HTTP code and the direction of your canonical domain redirect using the tool: https://httpstatus.io/.
Enter your domain name (1), tick ‘canonical domain check’ (2) and click the “Check status” button

If your domain status code does not match the example in screenshot below (this applies to non-'www' domain use), then there is a possibility that an error occurred when you entered the A Record into your domain's DNS Management.

Done.
Hopefully this tutorial on how to install WordPress on Cloudways helps. If you encounter difficulties or are unsure about any part of this tutorial, don't hesitate to ask via the comments column below.
Willya Randika
Hi, saya Randika, seorang Web Developer yang spesialis di WordPress, Astro, dan Next.js. Sejak 2015, saya telah membantu ratusan bisnis dan profesional membangun website yang tidak hanya cepat dan aman, tapi juga mudah ditemukan di Google dan efektif mengkonversi pengunjung menjadi pelanggan.
Related Articles

How to Migrate WordPress to Kinsta Manually
Complete guide on how to migrate a WordPress website to Kinsta safely and without downtime. Learn three migration methods: Kinsta's free service, the Migrate Guru plugin, and the manual way.

WordPress to Cloudways Migration Tutorial
Complete guide on how to easily migrate a WordPress website to Cloudways. Learn the migration steps using the Cloudways WordPress Migrator plugin and DNS configuration

How to Install WordPress on Kinsta
A step-by-step guide on how to easily install WordPress on the Kinsta hosting platform, including choosing a server location and filling in important details.

just.hosting: Global VPS with 20 Years of Experience
International VPS provider serving 329,000+ clients in 40 countries with a focus on flexibility, performance and competitive pricing
Hostinger: Global Infrastructure, Local Touch
The hosting platform that serves 5 million users in 150+ countries is now present with full commitment to the Indonesian market.

How to Create a Web Application Without Coding for Online Business
Complete tutorial on how to create a web application without coding for online business, starting from planning, creating, and putting the application online.
Cloudways Review
A complete review of Cloudways, a popular managed cloud hosting platform, discussing its advantages and disadvantages as well as how it compares to other providers. Suitable for beginners to developers.

Reseller Hosting vs Hosting Affiliate Programs: Which is More Profitable?
Compare the reseller hosting business model (cPanel/WHM) vs hosting affiliate programs in terms of margins, operations, risks and traffic requirements. Choose the monetization scheme that suits you best.
RunCloud Review
Complete review of RunCloud, a cloud panel for managing Cloud VPS. Learn about RunCloud's features, performance, price, advantages and disadvantages to help you decide.