---
title: WordPress to Cloudways Migration Tutorial
description: Complete guide on how to easily migrate a WordPress website to Cloudways. Learn the migration steps using the Cloudways WordPress Migrator plugin and DNS configuration
canonical: https://penasihathosting.com/en/wordpress-to-cloudways-migration-tutorial
type: standard
locale: en
updated: 2025-11-27
author: Willya Randika
---
# WordPress to Cloudways Migration Tutorial
## Overview
- **Summary:** Complete guide on how to easily migrate a WordPress website to Cloudways. Learn the migration steps using the Cloudways WordPress Migrator plugin and DNS configuration
- **Author:** Willya Randika ([profile](/penulis/willya-randika))
## Article
In this article, I will discuss how to migrate WordPress to Cloudways.
Previously, I published two articles in my series about Cloudways:
* [Complete Cloudways review with performance test (comparison of Digital Ocean standard vs premium)](/en/cloudways-review/)
* [Tutorial on how to install WordPress on Cloudways](/en/tutorial-or-how-to-install-wordpress-on-cloudways/)
Cloudways does offer free migration for one website, but if you want to migrate yourself, you can follow this tutorial.
Don't worry, it's quite easy.
If you experience difficulties in this migration process, remember that you can always contact me via email at ***randi(at)penasihathosting.com.**
Usually, I reply to incoming messages in less than 12 hours, but if I'm online, I usually reply to incoming messages immediately.
### 1. Create your (free) Cloudways account
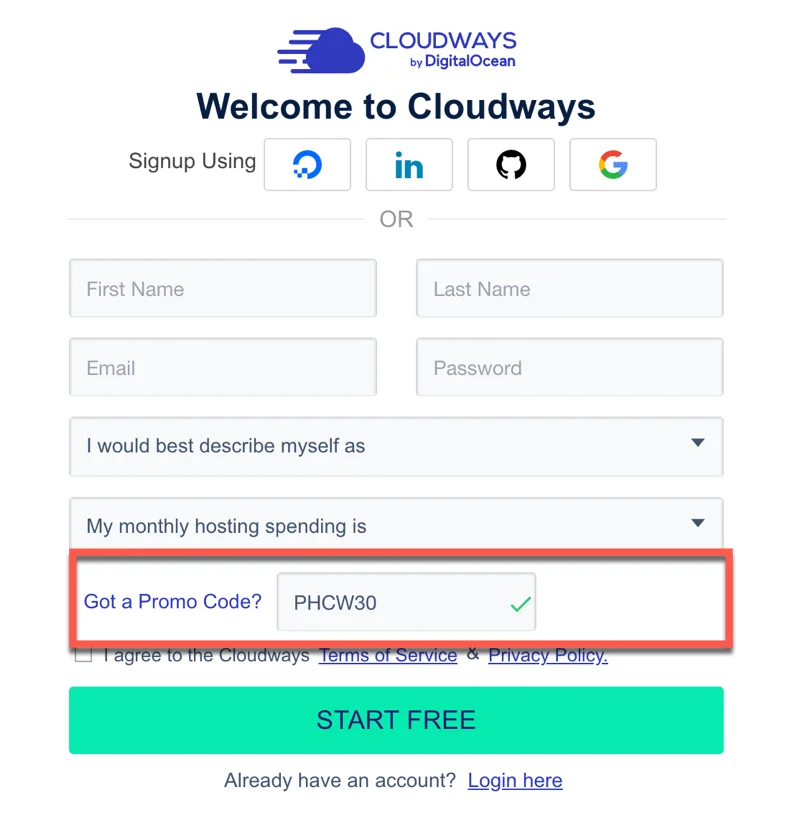
First, if you don't have a Cloudways account, you need to create one first.
### Cloudways Hosting
Get 30% discount for 2 months with the promo code below. Free 3 day trial no credit card required!
**Promo Code: PHCW30**
Your support helps this website keep running! I use an affiliate link, where I will receive a $65 commission from your Cloudways hosting purchase. You will not be charged any additional fees.
### 2. Prepare Your WordPress Server and Applications
After registering, first you need to set up the server. Click "Add application".
Oh yes, below is the new Cloudways user interface. If it turns out that your user interface still uses the classic one, don't forget to change it to the new one first.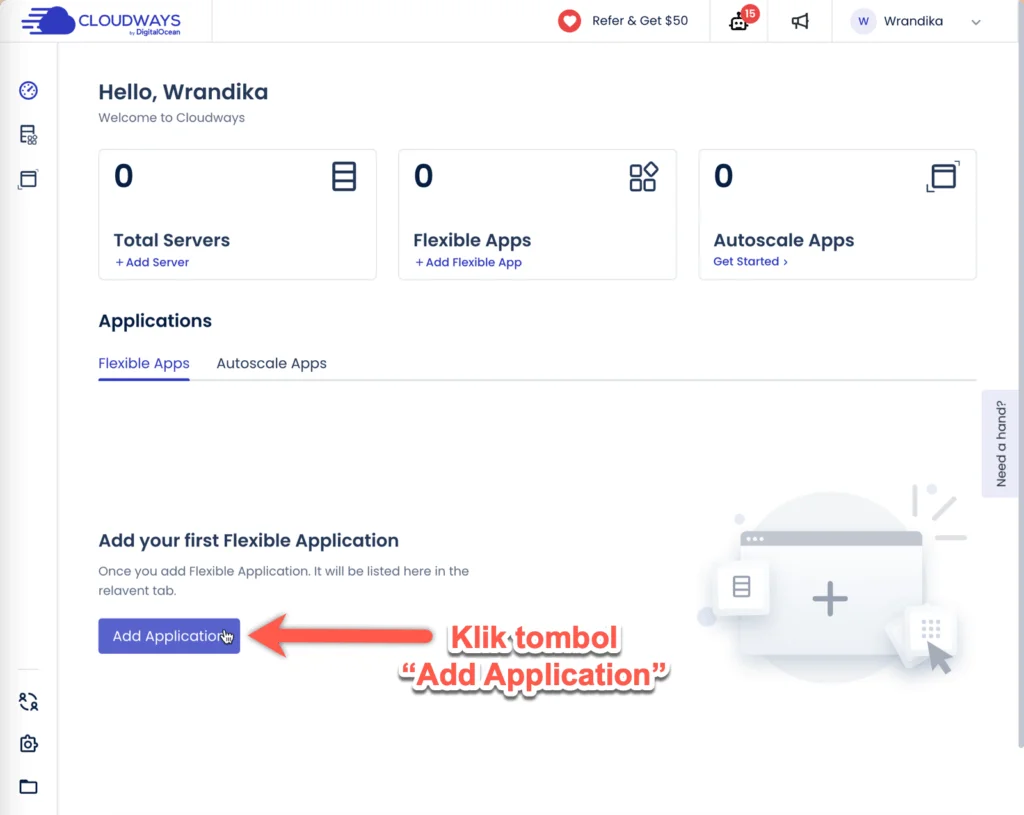
**FILL IN THE APPLICATION AND SERVER DETAILS**
You can choose the latest WordPress version.
You can also choose Clean (No Cloudways Optimization) if you want to optimize your WordPress yourself (not recommended for beginners).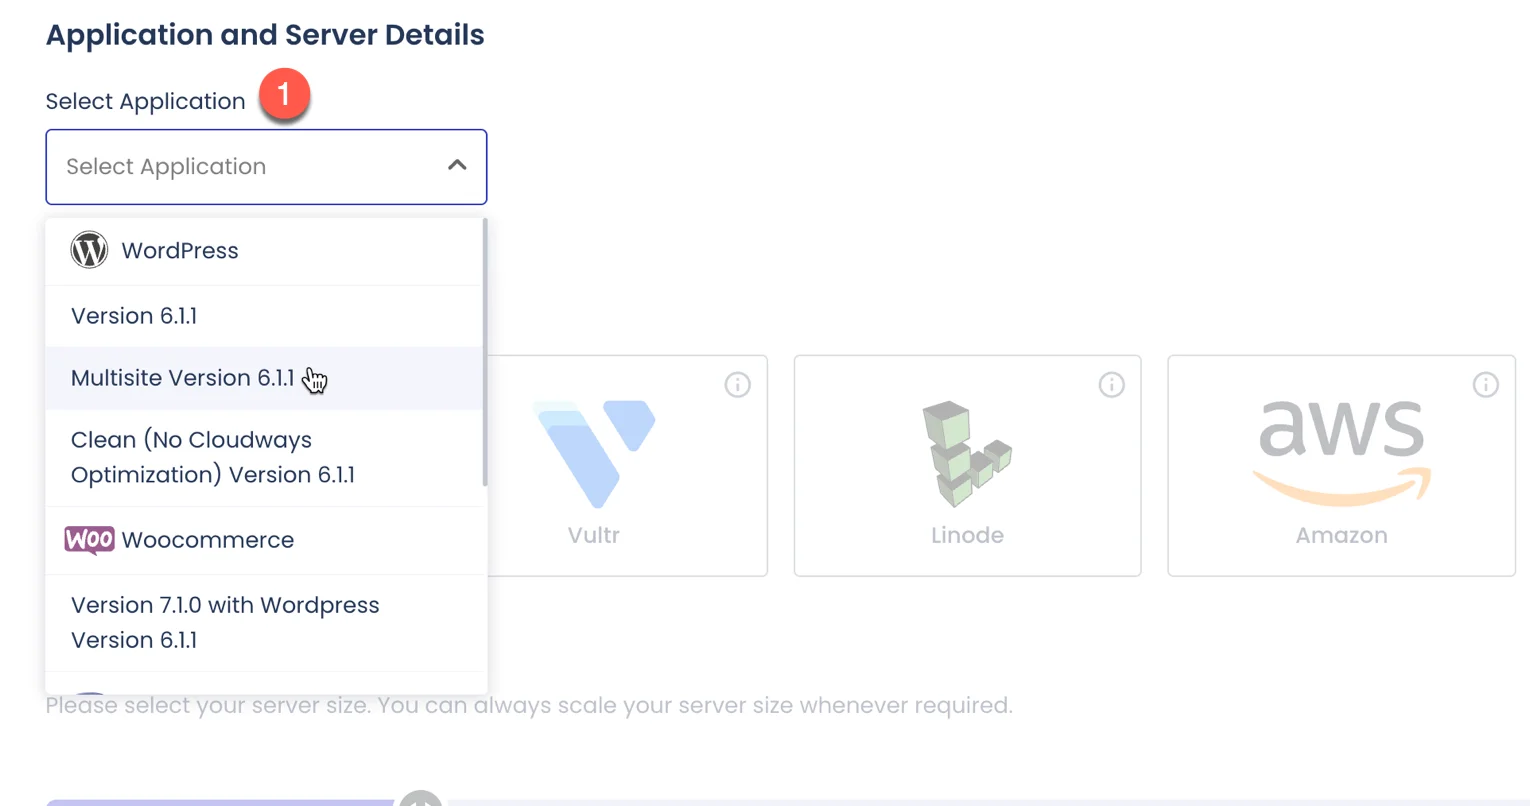
Then fill in your application details. You are free to choose the name you like. This won't affect anything and you can also replace it later.
**SELECT SERVER, SIZE AND LOCATION**
After that, follow these steps:
* Choose a server: if you are just starting out or not sure, my suggestion is to choose Digital Ocean (2)
* Select server size: depending on the specifications of your website. If you are not sure, you can start from 1 or 2 GB first. Remember that you can upgrade your server size later easily. (3)
* Select location: if your website is in Indonesian, select Singapore. If international, choose one in the United States. (4)
* Watch all your server and application details again. If so, click the "LAUNCH NOW" button located at the bottom right of your screen. (5)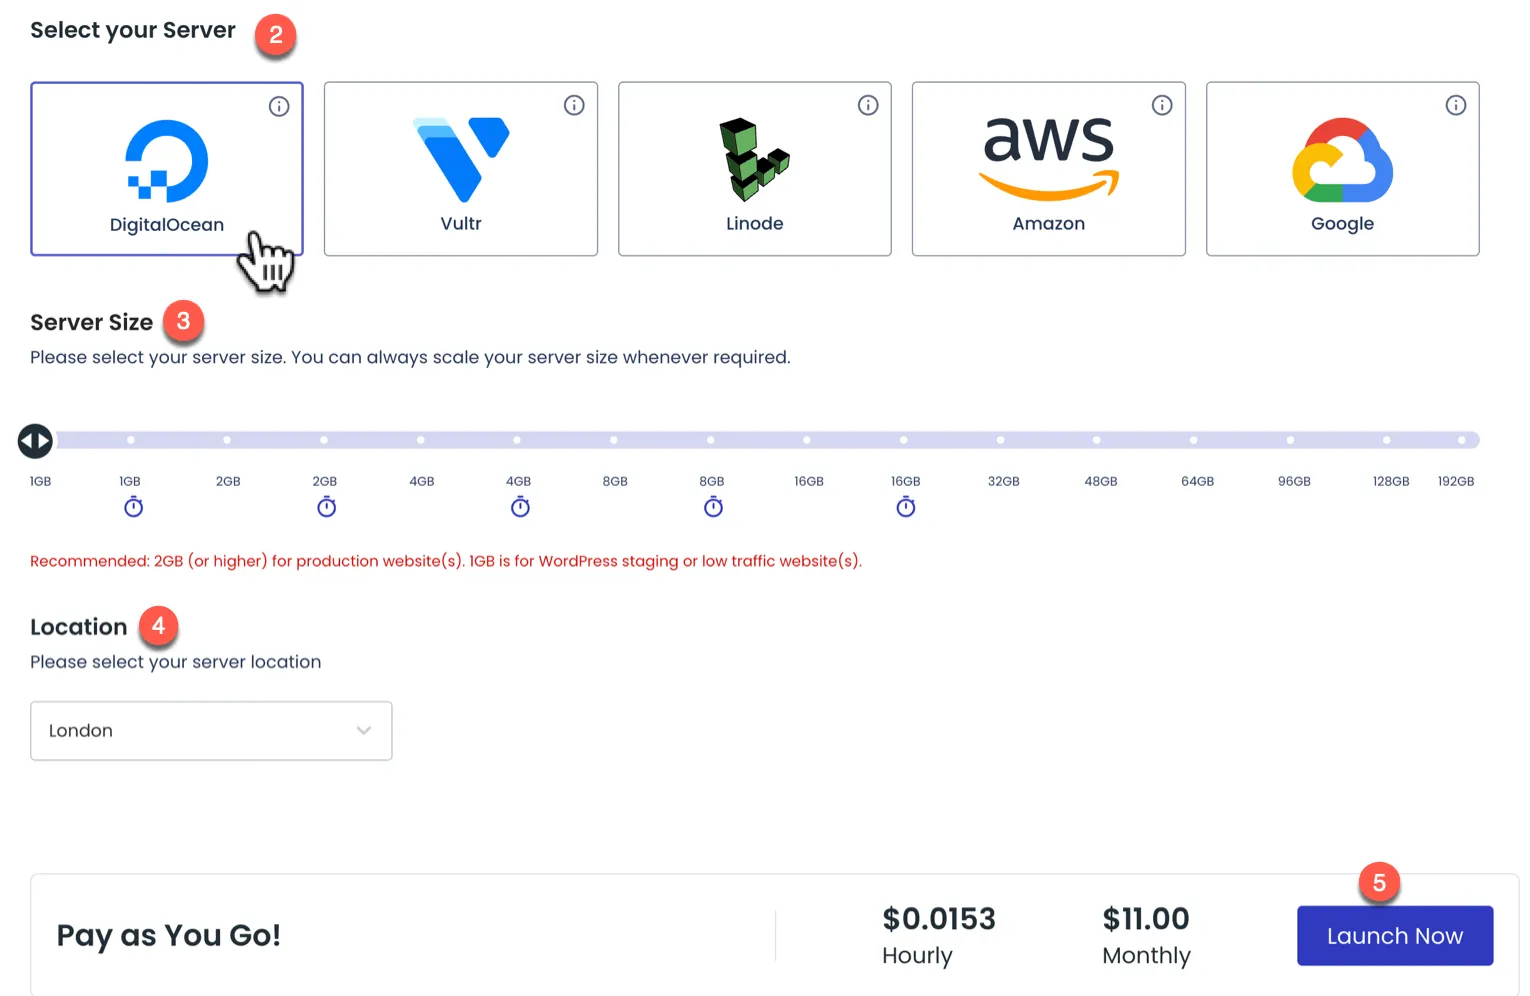
You need to wait a bit for your server to finish creating. The estimate is around 7 minutes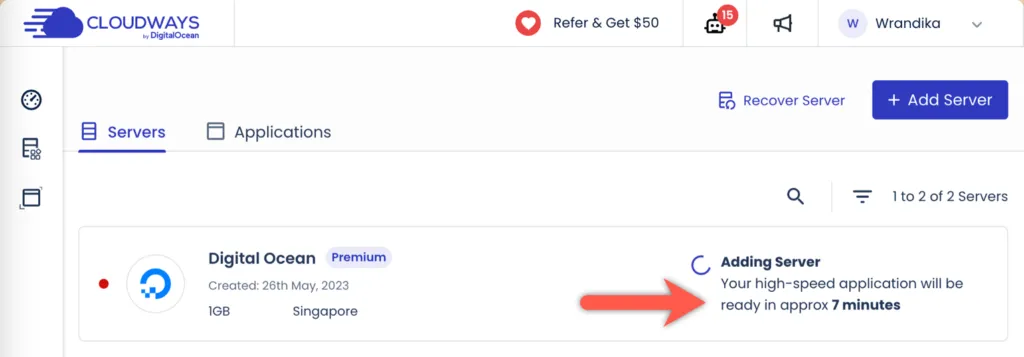
### 2. Migrate Your WordPress to Cloudways Using the Cloudways WordPress Migrator Plugin
**INSTALL CLOUDWAYS WORDPRESS MIGRATOR PLUGIN**
Next, log in to the WordPress website on your old hosting. Install the **Cloudways WordPress Migrator** plugin.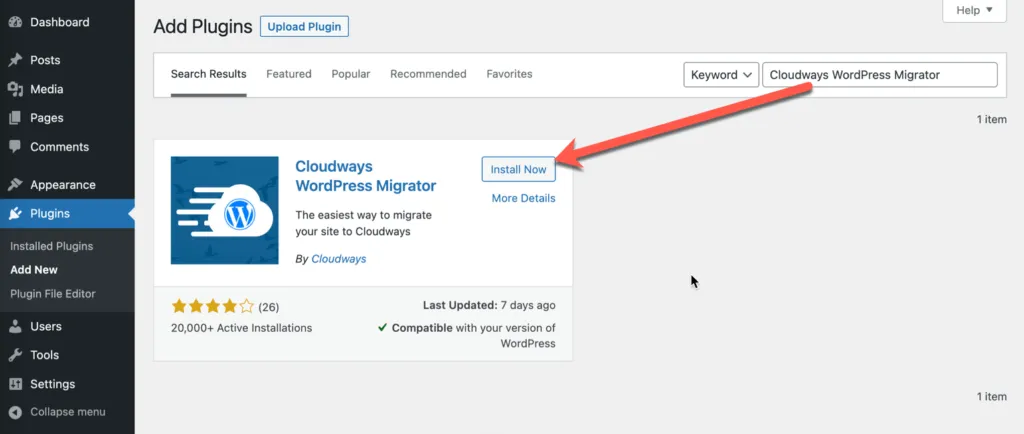Enter your email. This email does not need to be the same as your WordPress admin email. Check "I agree.." and click the "Migrate" button.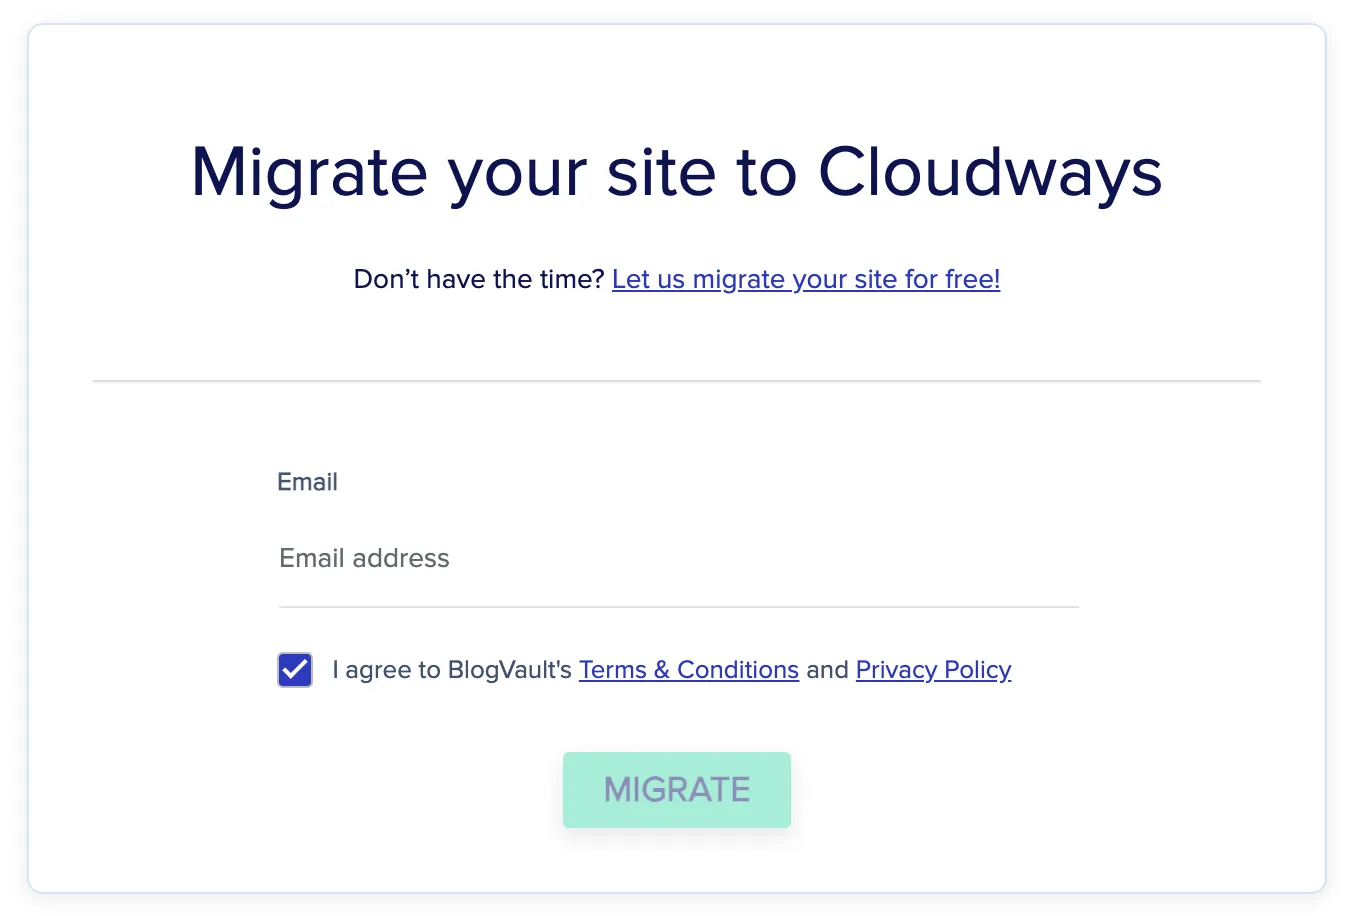**FILL IN MIGRATION DETAILS**
There are 5 forms that you need to fill in as I numbered them in the *screenshot* below. Ignore everything else if you are unsure or unsure.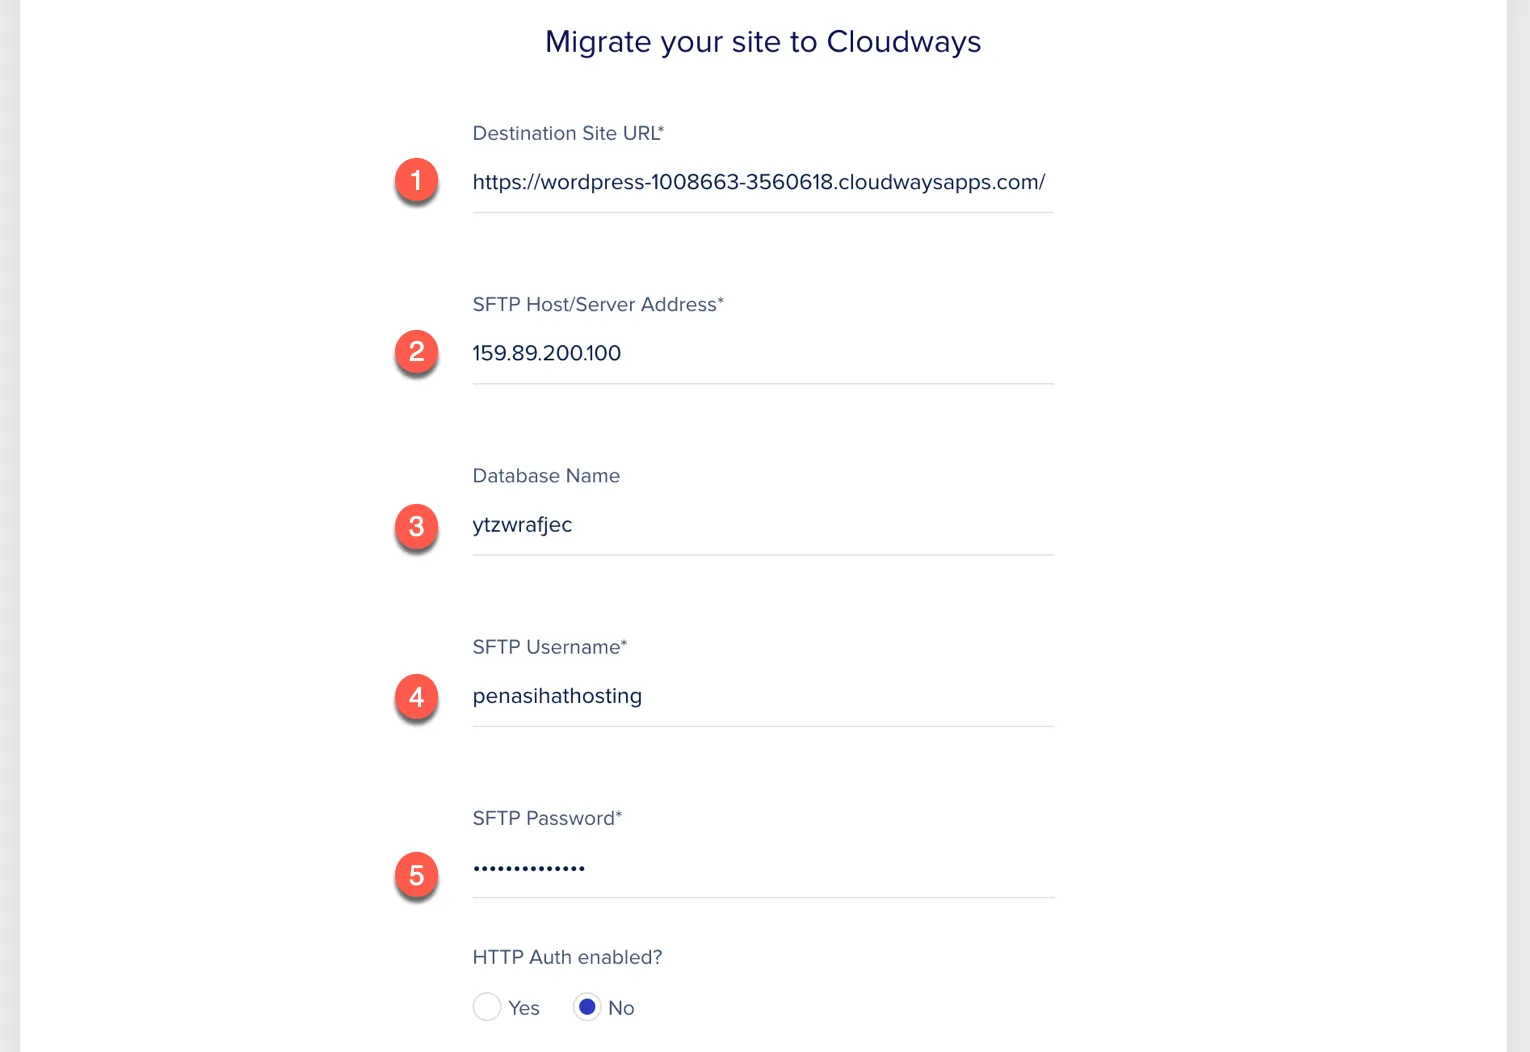
**How do I fill in the details?**
**(1) Destination Site URL:** Fill in the temporary domain provided by Cloudways in the Application URL.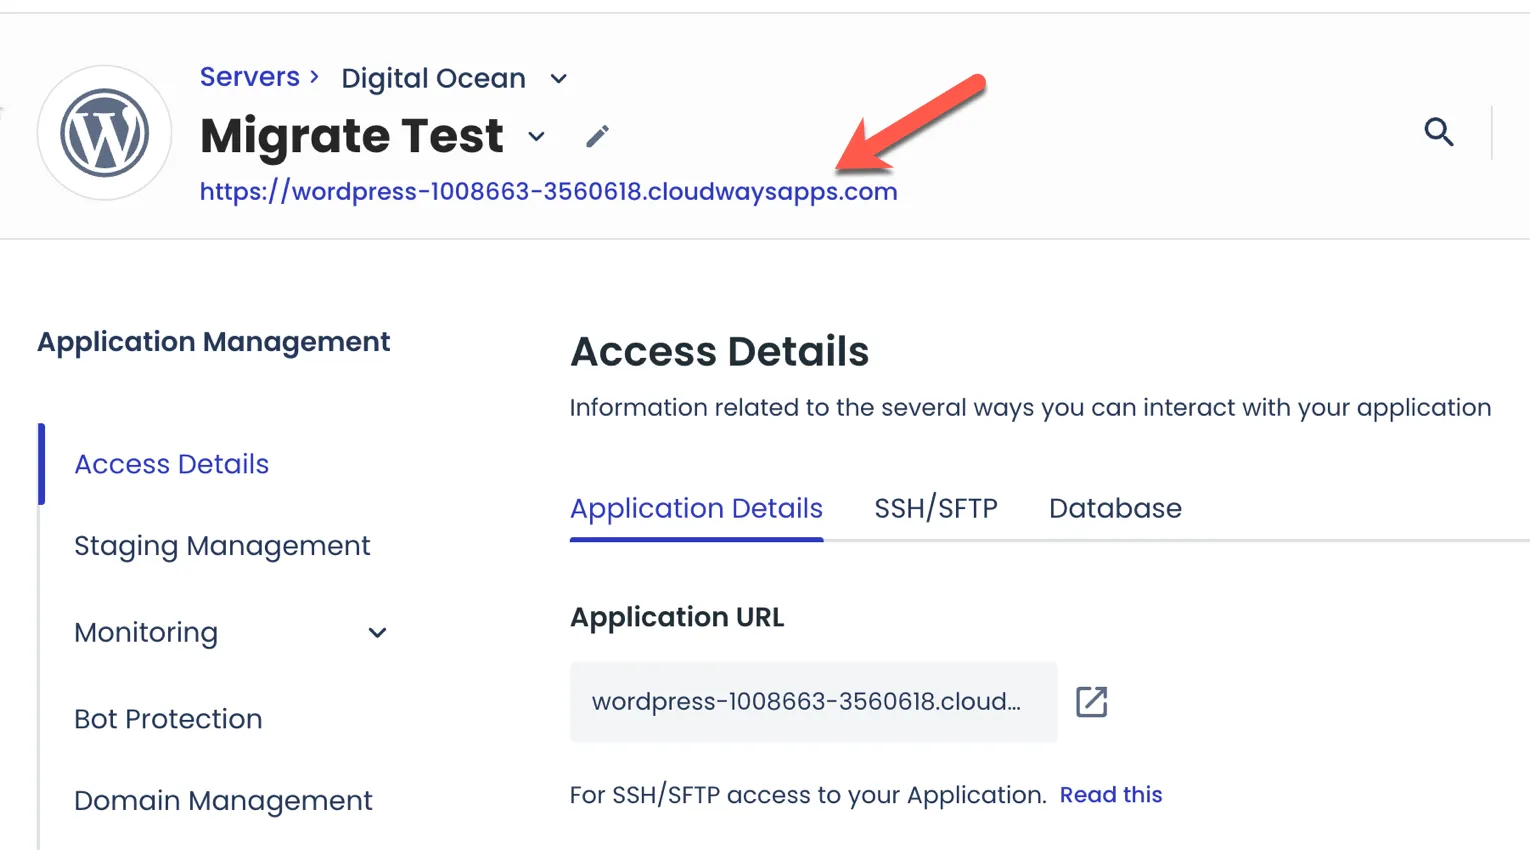
**(2)SFTP Host/Server Address:** copy public IP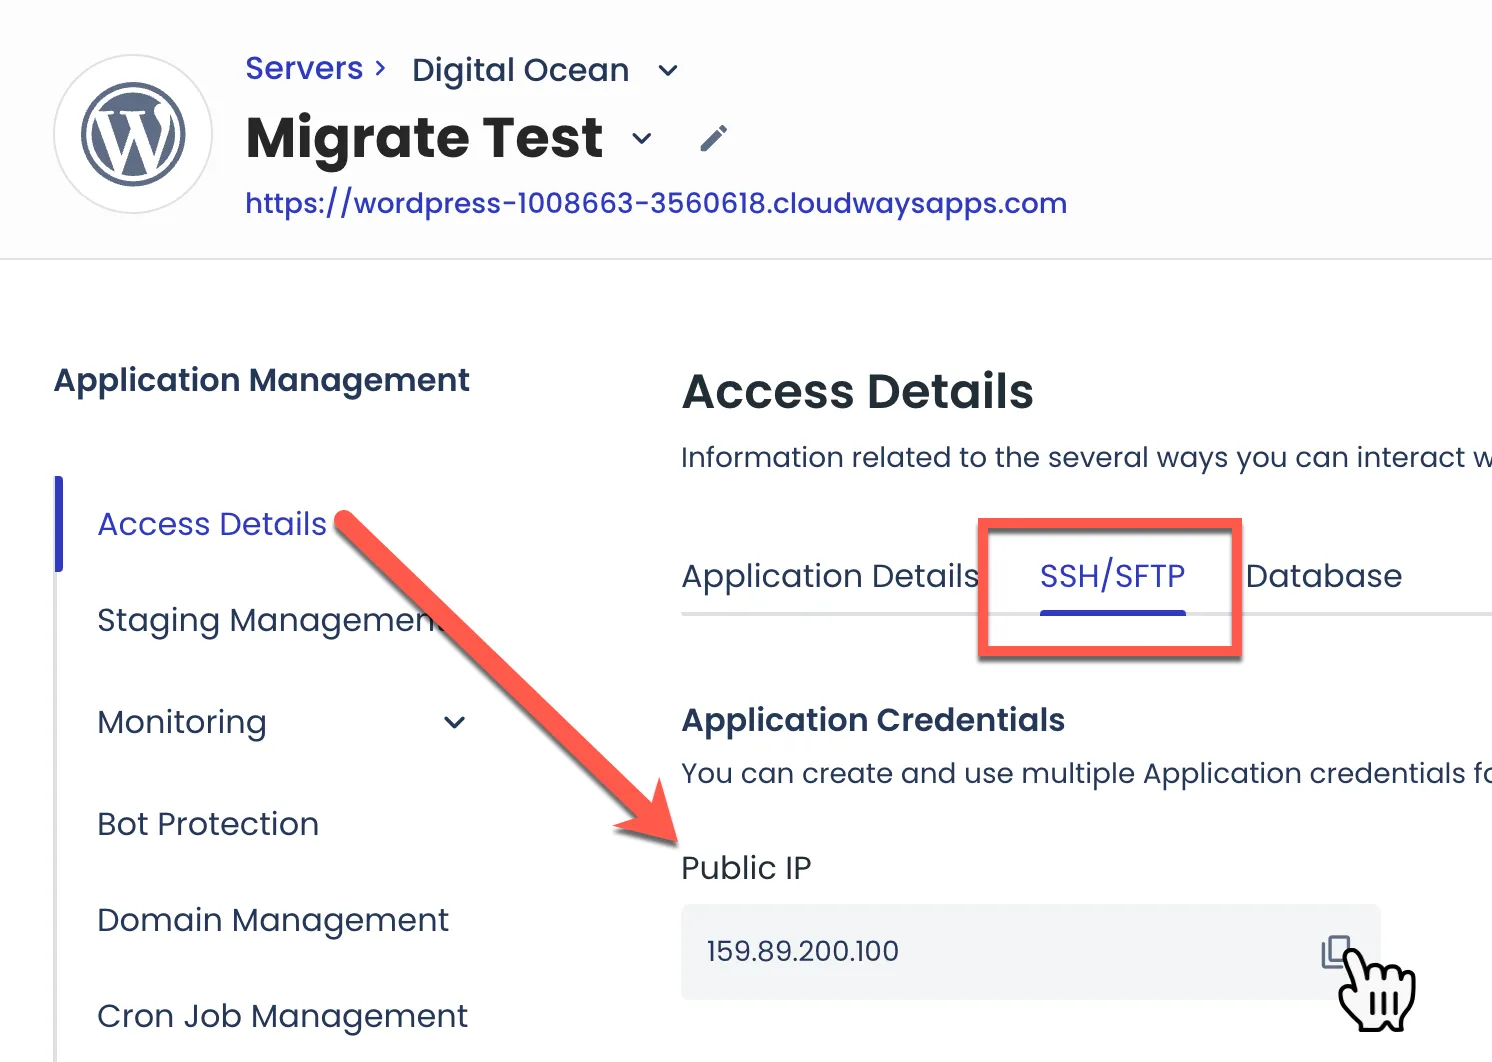
**(3) Database Name:** copy DB name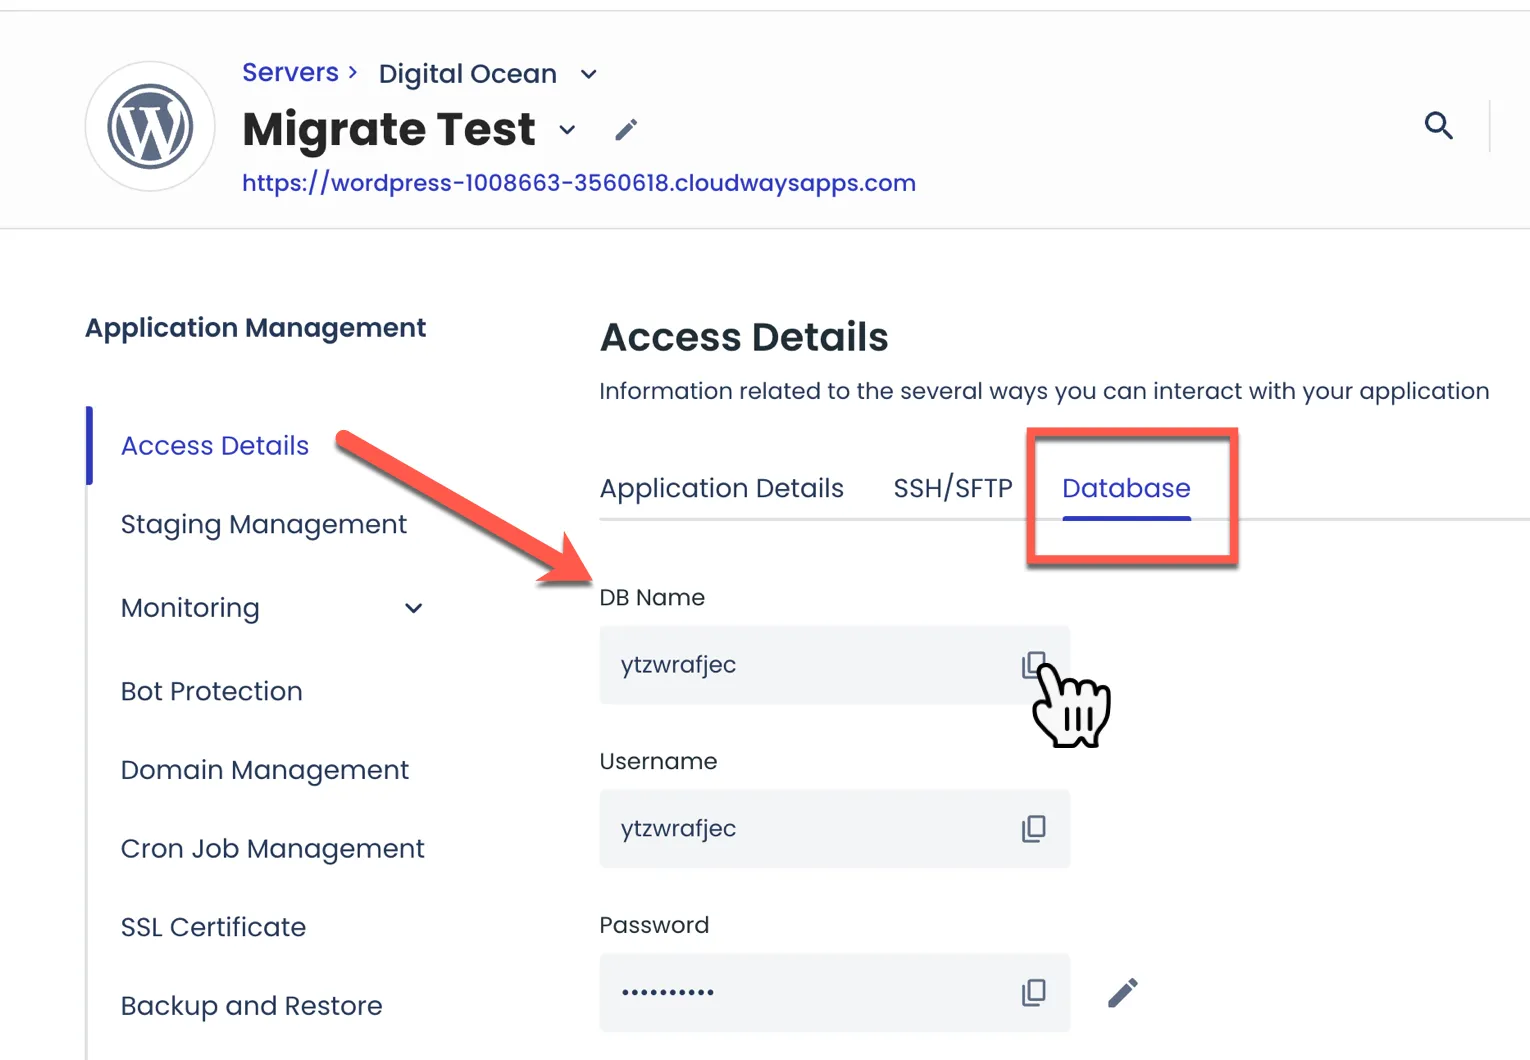
**(4) SFTP Username and (5) SFTP Password:** You need to create your own username and password.
Move the tab from "Database" to "SSH/SFTP" then click the "Add SFTP User" button and create your App Credentials, namely username and password. So, the username and password you created are what you need to save and fill in the migration form.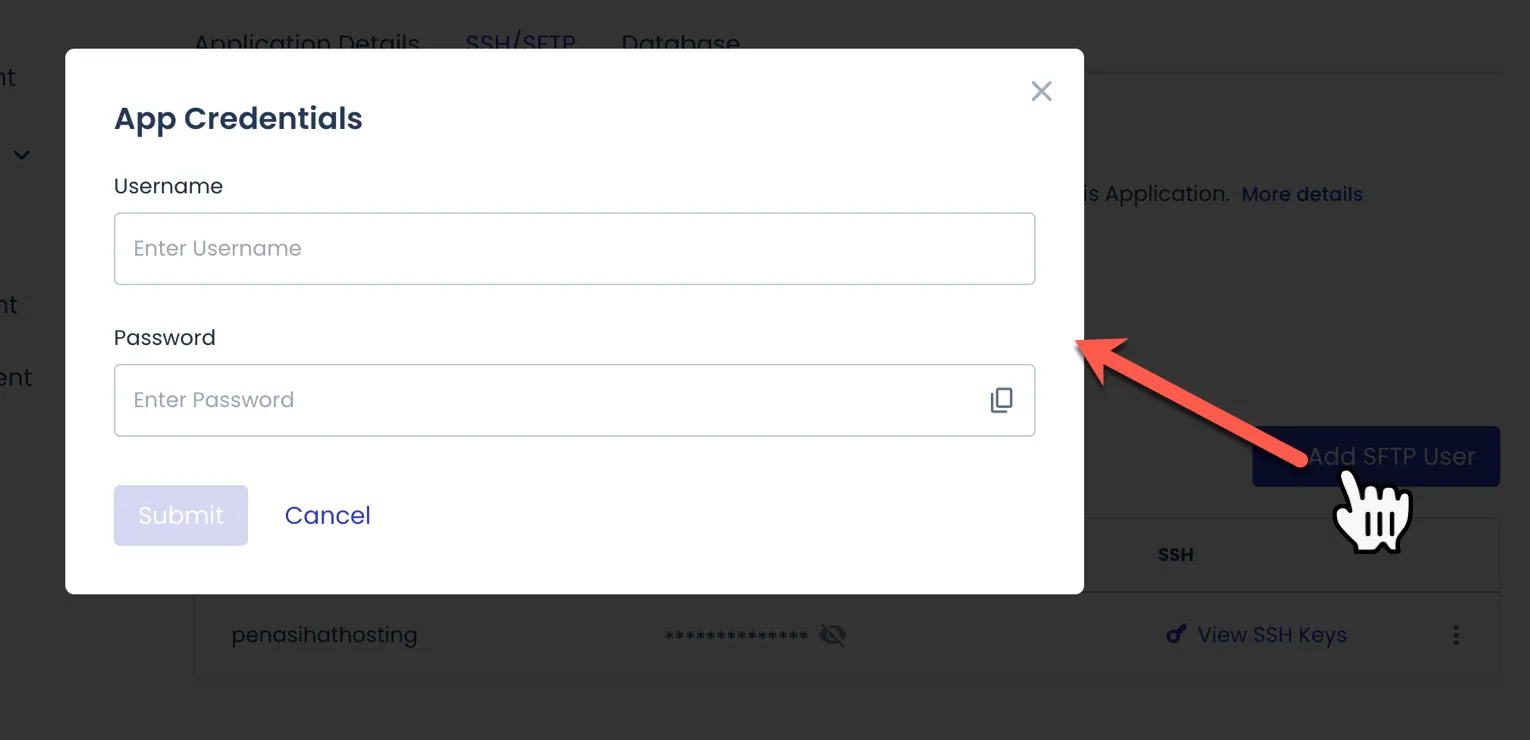
If everything has been filled in, click the green "Migrate" button
**VALIDATE AND START THE MIGRATION PROCESS**
The Cloudways WP Migrator plugin will start by validating the details you filled in, then the migration process will be carried out.
It depends on the size of your website and your internet speed, but the process shouldn't take too long.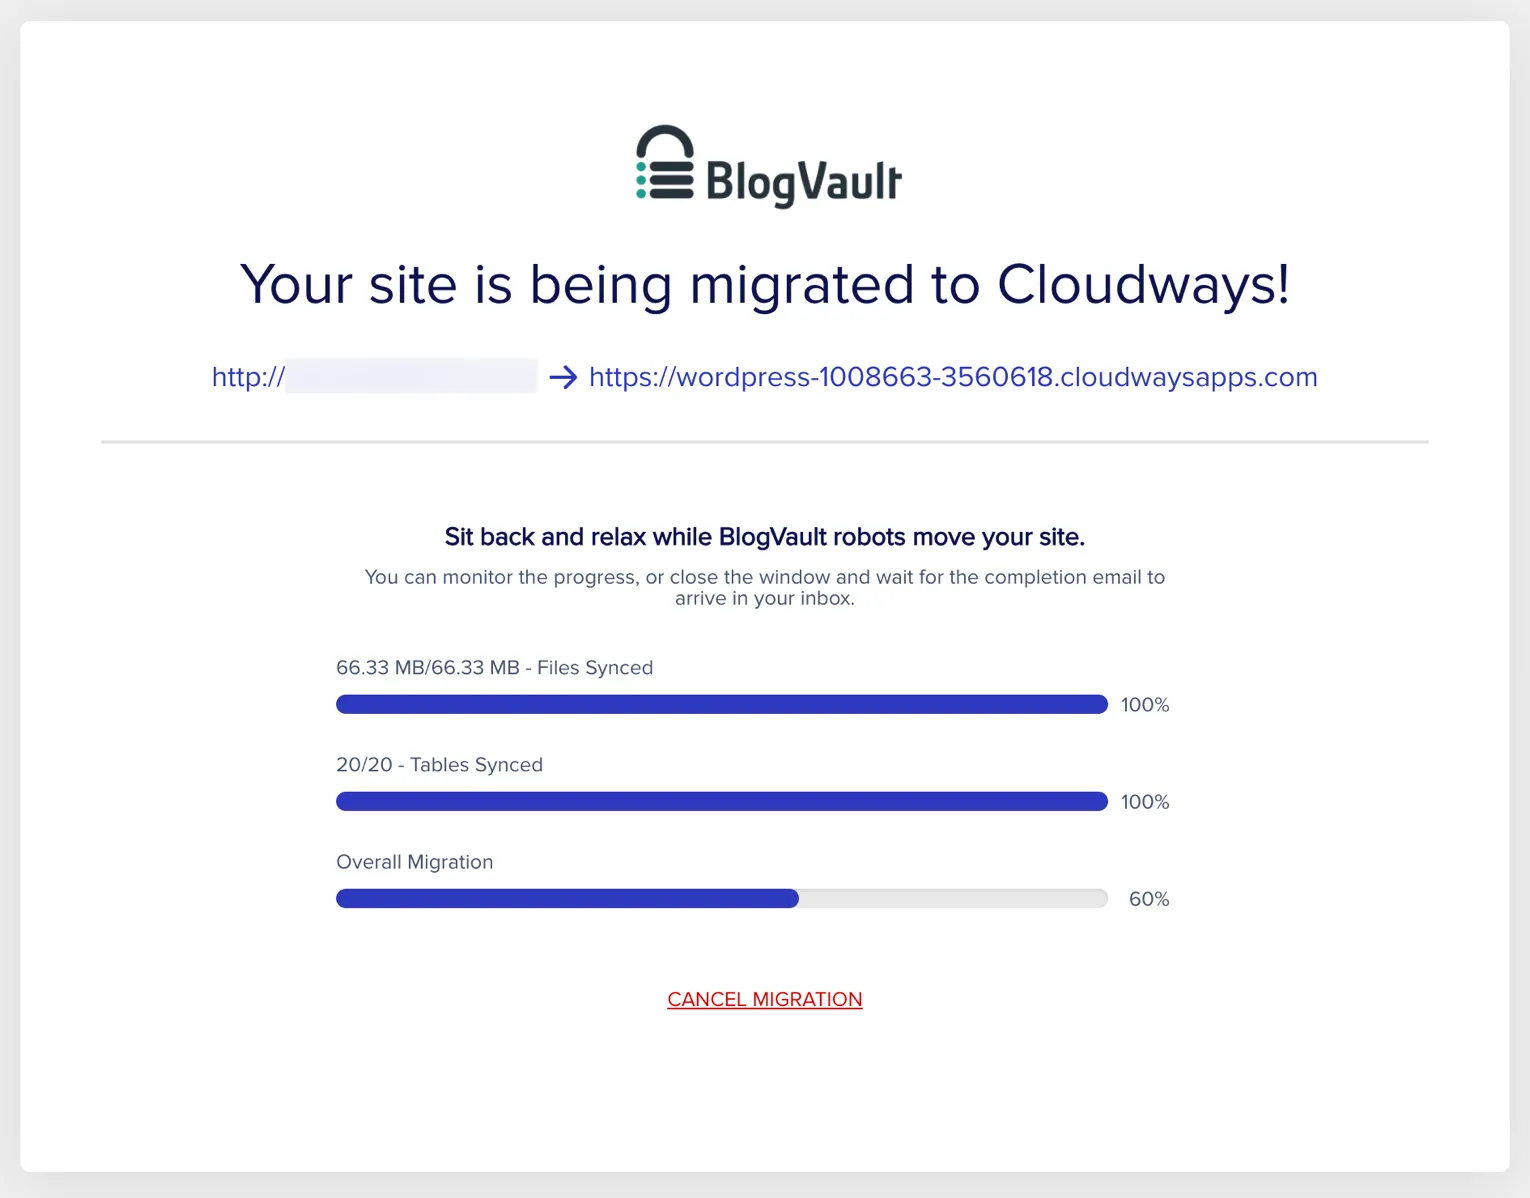
If the migration process is complete, you will see a message like the one below: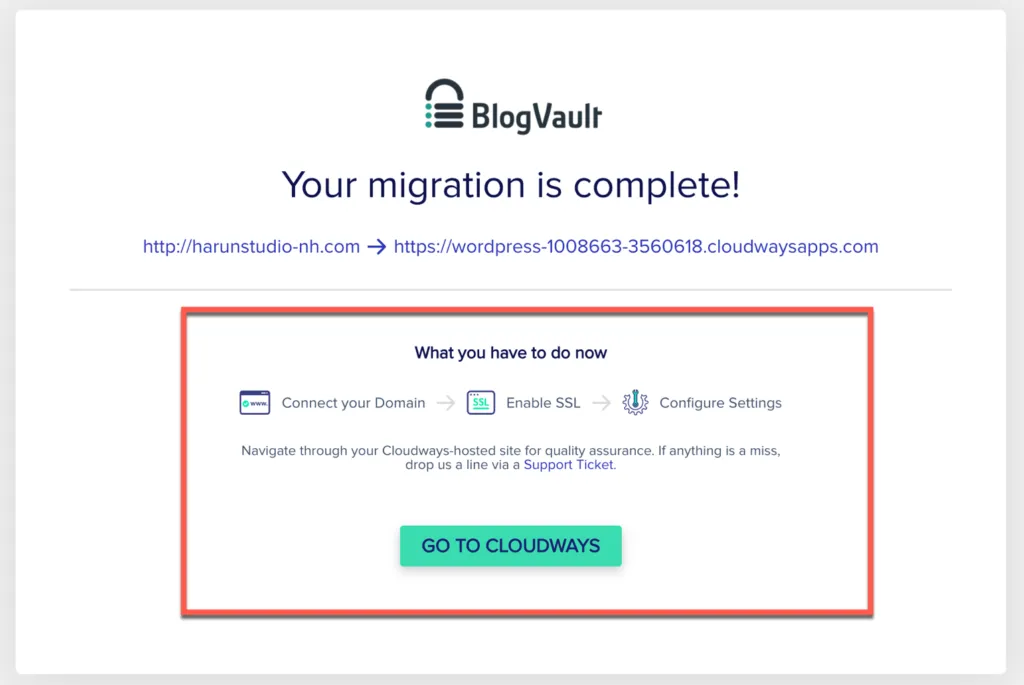
At this point, you need to first see your *destination website* by clicking on the temporary domain link provided by Cloudways.
If you don't see any changes on your destination website, then you have to clean/clear varnish your server first.
The method:Click Servers as I show in the screenshot below: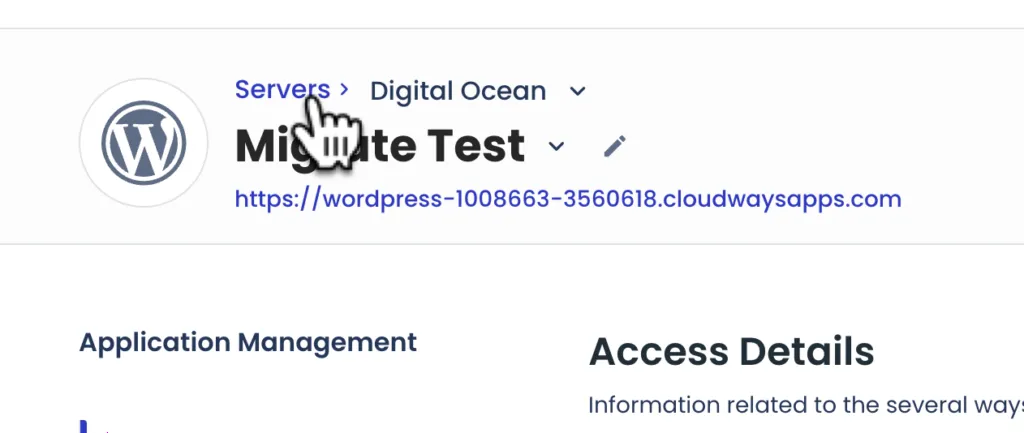
Then, click managed services on the left -> and click purge as I directed in the image below: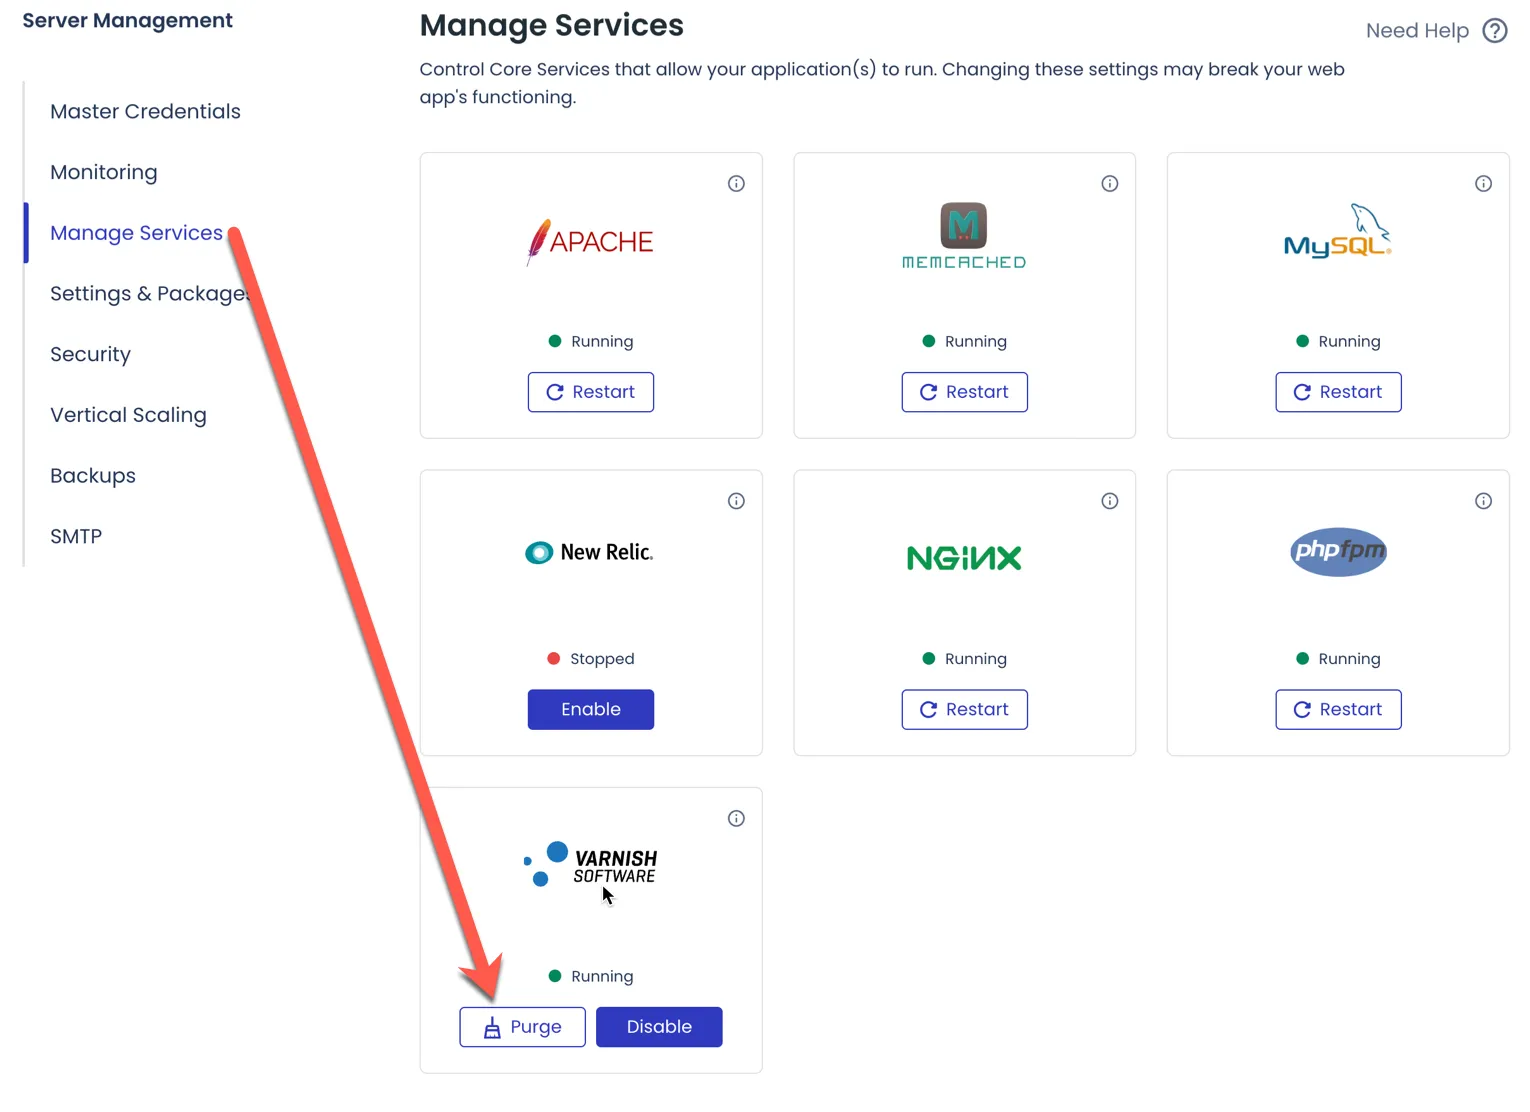
After that, your destination website should have changed.
Check all website pages, you may also need to log in to wp-admin to check whether everything is OK.
### 3. Adding a Domain to Your WordPress Application
At this stage, your WordPress application has been successfully installed, but is still using a temporary domain name, as you saw in the previous step at *website destination*.
Of course you wouldn't use [domain](/en/domain/) in the meantime, right? Which looks like this: *wordpress-362278-1127190.cloudways.com.
* Then you need to add your own domain and connect it to the Cloudways server.
How:
**ADDING DOMAIN**
open the **Domain Management** menu in the *sidebar* on the left (1), then click the "Add Domain" button (2)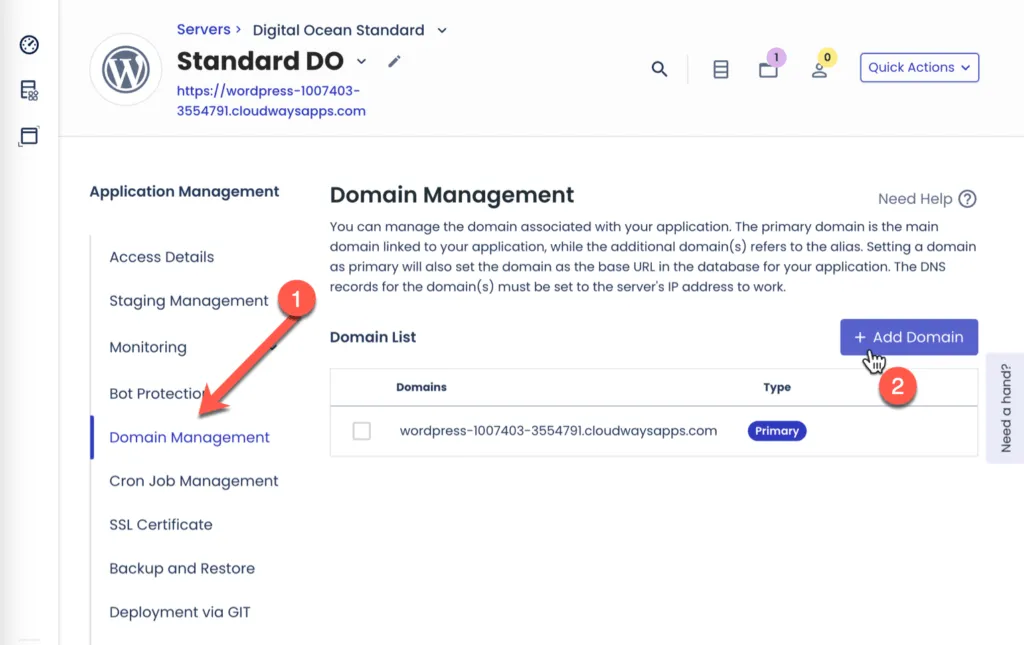Then enter your domain name, click the "+ Add Domain" button.
If you use 'www' in your domain, then add 'www'.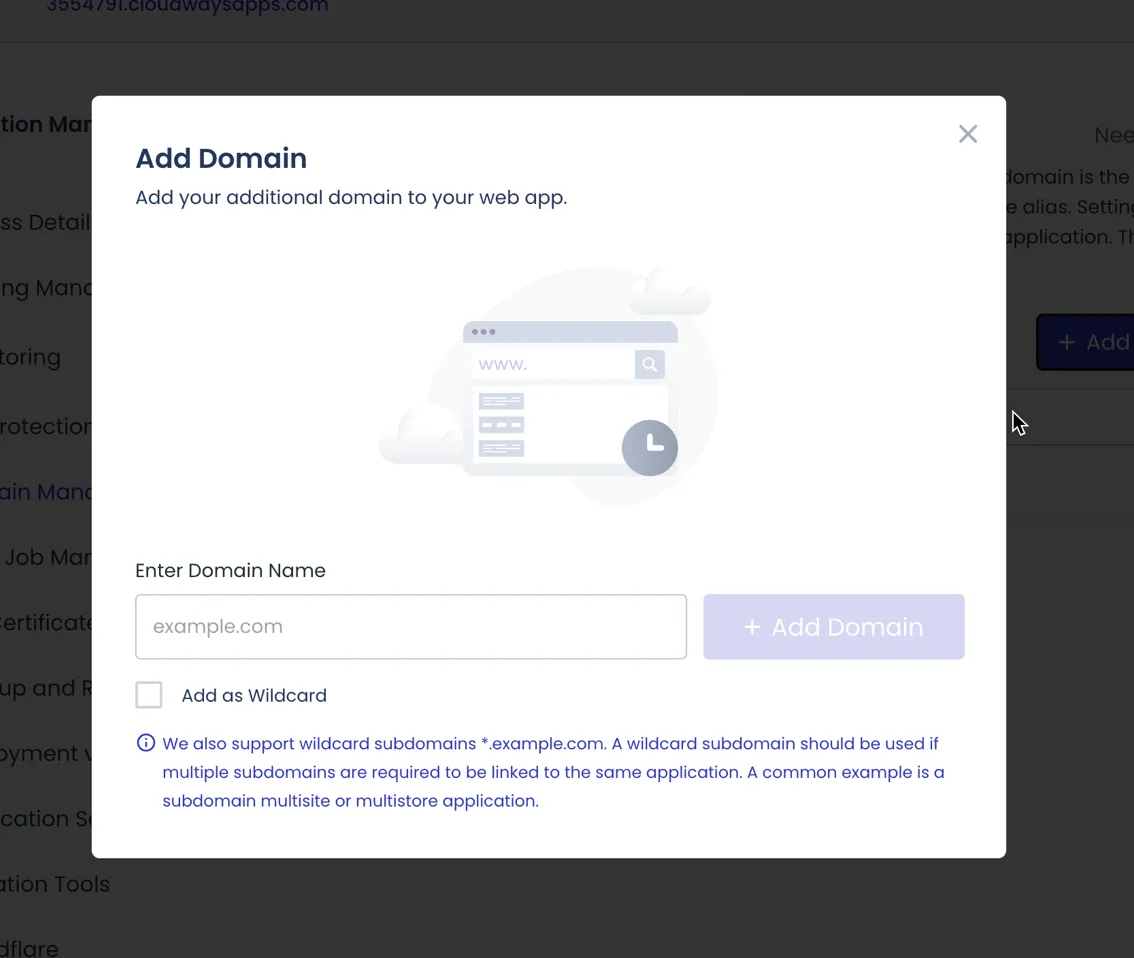
Then, make the domain you just added 'Make Primary'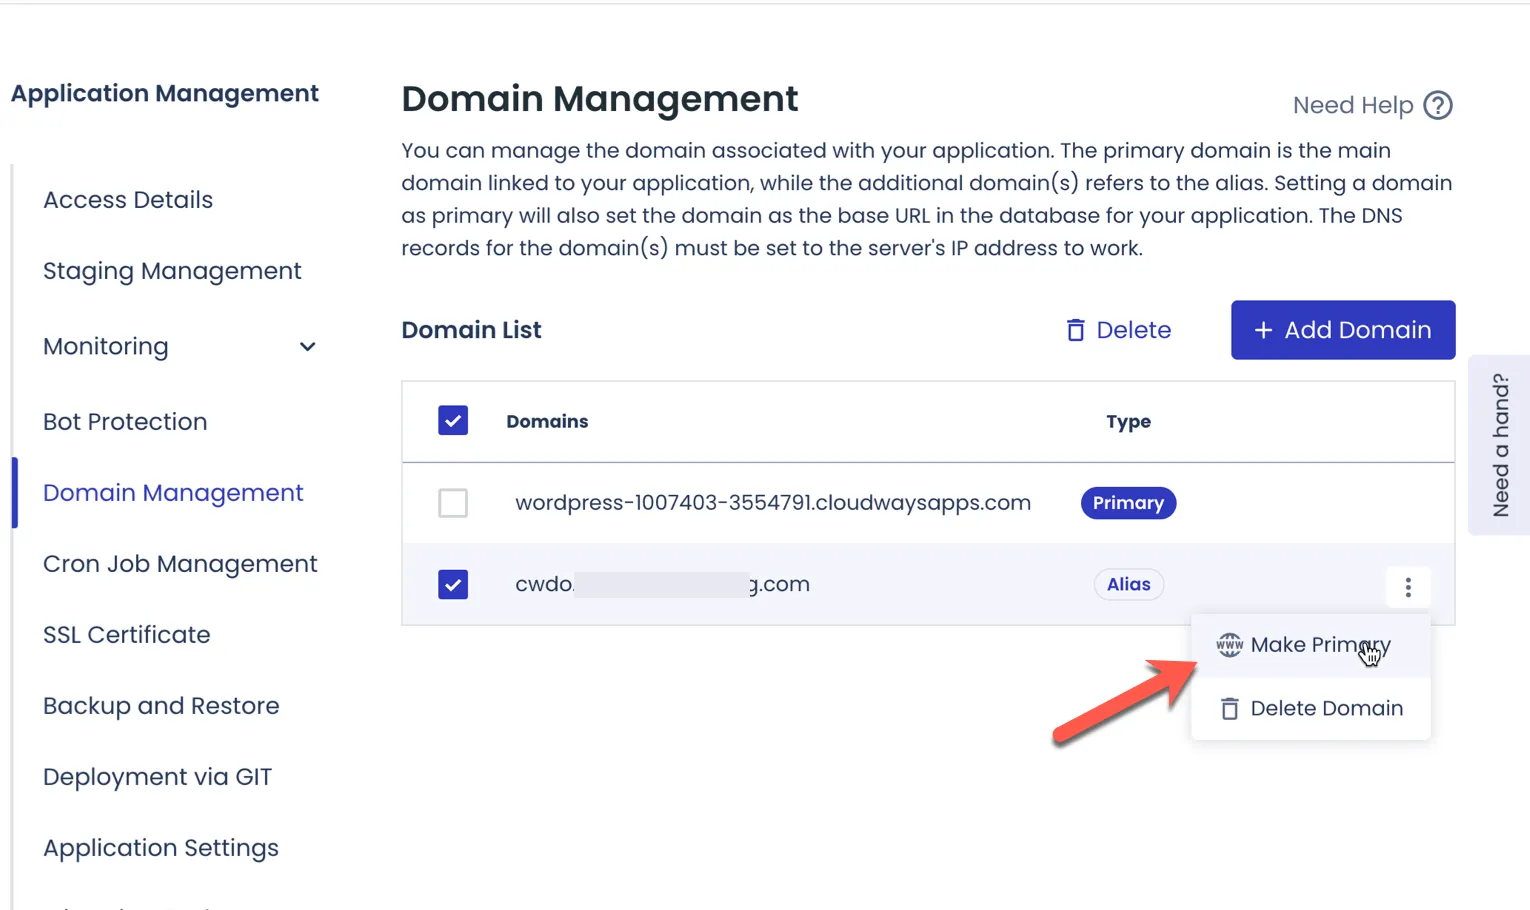
**ADDING A RECORD IN DNS MANAGEMENT**
Next, depending on the provider where you buy the domain, you need to add an A Record to your domain's DNS Management.
* Type \= A Record
* Host \= @ (unless you want your domain name to use "www", then fill it with "www")
* Value \= Fill in your server's Public IP (the same IP that you copied to the previous migration form)
* TTL \= Leave it as is or set Automatic

*How to add A records in Cloudflare DNS management*
Also make sure you add an A record for the 'www' version of your website and that it is directed to the same IP. Later, the 'www' version will automatically redirect to the 'non www' version of your website.
**PLEASE NOTE:**
By default, Cloudways does not use NS, so all you need to add/replace **is only A Records.
Until here, you just need to wait. If you have filled in the A Record correctly, it should take less than 15 minutes or at most 24 hours for your domain to be connected to the server.
Until here, you just need to wait.
If you have filled in the A Record correctly, it should take less than 1 hour or it could take just a matter of minutes or a maximum of 24 hours, your domain will be connected to the server.
You can check your DNS status at [DNSChecker](https://dnschecker.org/).
### 4. Install SSL
After your domain is connected to the server, you are required to install SSL (free) for the security of your website.
How:
* Open the "SSL Certificate" menu (1)
* Select Lets Encrypt (2)
* Enter your email (3) - Doesn't need to be the same as Cloudways email Enter domain name (4)
* Click the "INSTALL CERTIFICATE" button (5)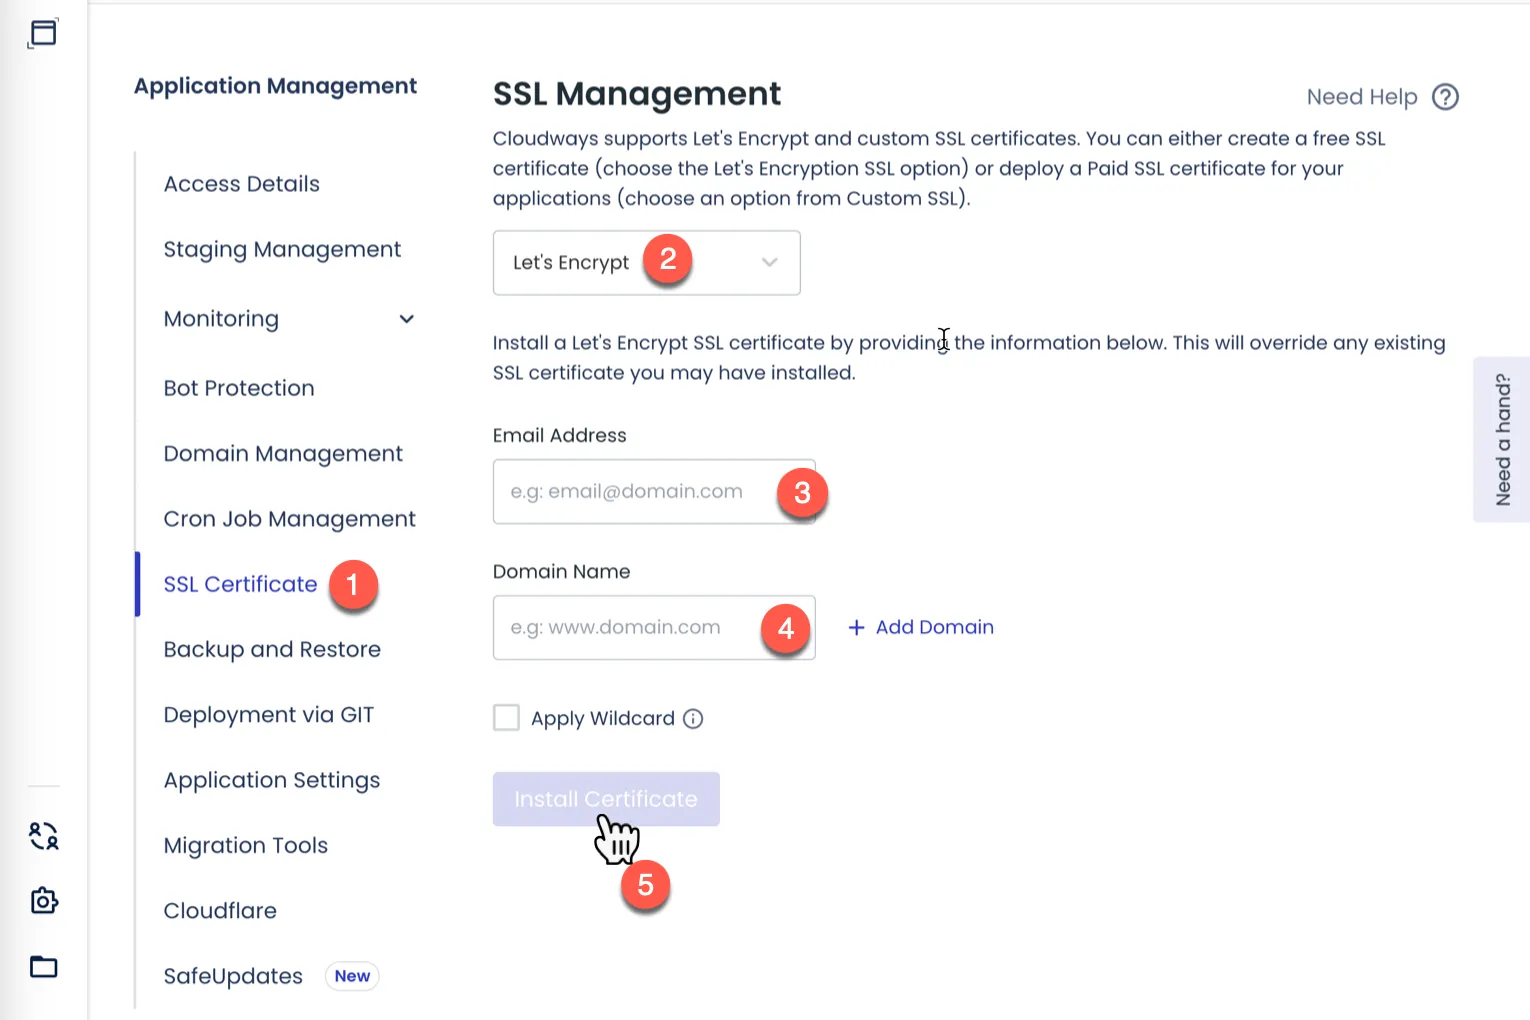
It is also a wise step to verify that all the changes you made have been implemented successfully. Test your website using [WhyNoPadLock](https://www.whynopadlock.com/) to see whether the SSL is valid and the HTTPS force is correct.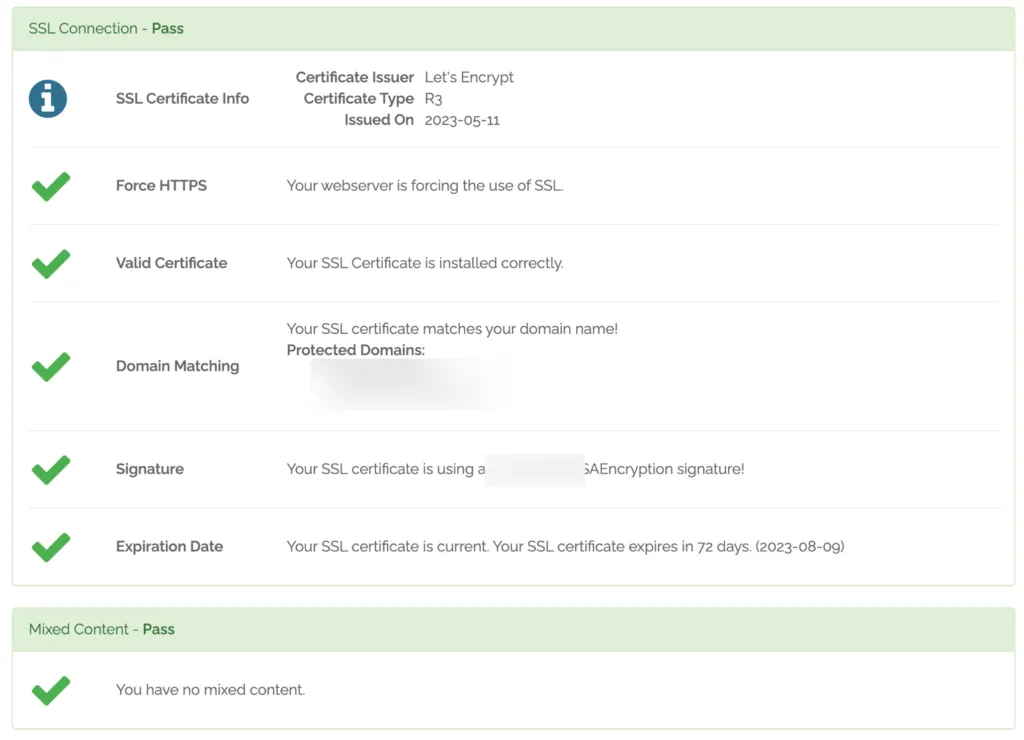
I also suggest you do a test redirect map on your domain using [https://httpstatus.io/](https://httpstatus.io/). This test is useful to ensure that there are no *redirect chains* that could damage the *technical
* SEO of your website.
The results should be like this (this applies to using non 'www' domains), if they are not the same, then there is most likely an error when you enter the A Record into your domain's DNS Management.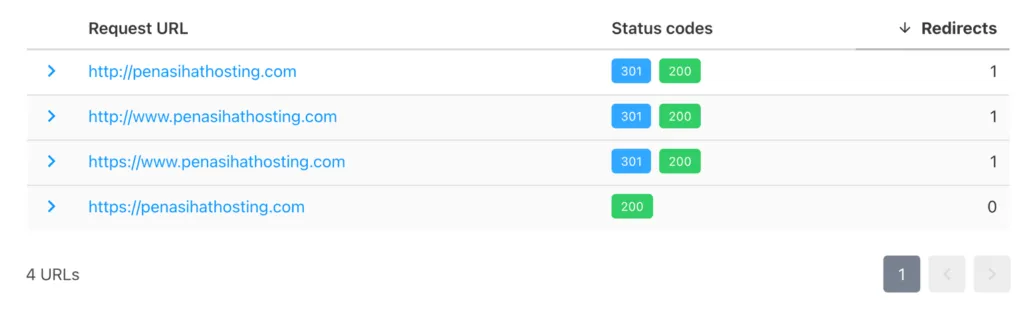
Hopefully this tutorial on how to migrate WordPress to Cloudways helps. If you encounter difficulties or are unsure about any part of this tutorial, don't hesitate to ask via the comments column below.